Learn what YubiKey HSM is and how you can use it for authentication. Discover how to use YubiKey for Code Signing Certificates.
Your Code Signing certificate is like a digital seal of authenticity for your software, ensuring its integrity and origin. It is obtained from trusted Certificate Authorities like.
As you probably already understand, its primary purpose is to verify that the software you distribute comes from you and hasn’t been tampered with by malicious hackers. To bolster its security, you can use a YubiKey hardware token, a powerful safeguard against unauthorized access.
What is YubiKey?
An YubiKey, or ubiquitous key, is similar to a USB thumb drive. The YubiKey is a hardware secure module created by Yubico designed to provide extra security for your online accounts.
Rather than dealing with complicated authentication methods like texted codes or app-generated ones, the YubiKey simplifies the process with just a press of a button.
It’s that easy! Each YubiKey comes with a unique code that helps confirm your identity, making it virtually impossible for hackers to breach your accounts.
This versatile little tool offers multiple layers of protection for your login credentials across various platforms, including email, online services, apps, computers, and even physical spaces.
It acts as your key to trust, preventing potential account takeovers and safeguarding your digital identity.
With the YubiKey in hand, you can rest assured that your online presence is fortified and shielded from unauthorized access.
There are a number of authentication protocols that YubiKey supports, including FIDO, PKI, OATH-HOTP, and OpenPGP. YubiKey simplifies two-factor authentication and provides hardware-based protection while also being widely supported and a viable option for developers and organizations.
YubiKey stores static passwords for websites that do not support one-time passwords. Currently, Google, Amazon, and Twitter use YubiKey devices for their internal and external accounts.
How do I use YubiKey for Authentication?
Passwords, despite our best efforts, often fall short of protecting us from hackers. They are either weak or too complex to remember, and leaks are inevitable.
To bolster security, we turn to two-factor authentication (2FA), where you need both a password and something else to prove your identity. Enter the YubiKey, a nifty hardware token that makes 2FA a breeze.
Simply plug it in and press a button! The YubiKey generates a unique, lengthy code, adding robustness to your authentication.
Plus, no more typing out codes yourself, making it both secure and convenient.
Follow these steps to use YubiKey for authentication;
Step 1: Plug your YubiKey into a USB port on your device.
Step 2: Visit Yubico.com/setup. On your browser, navigate to Yubico’s setup page. Once here, select your YubiKey device.
Step 3: App selection. Browse the list of supported apps and select only those you wish to protect.
Step 4: Follow the instructions. Yubico provides clear, user-friendly instructions for each app. For this guide, we will use Google as an example:
- Add YubiKey to Google: Find the link with instructions for adding your YubiKey to your Google account.
- Device setup: Plug in your YubiKey and press its button when prompted.
- Permission request: Your browser might seek access permission; grant it.
- Confirmation: Once you’ve set up your YubiKey, you’ll receive a confirmation message.
Step 5: Naming your YubiKey. This step is optional. It would be best to give different names if you have more than one YubiKey though. This will help with easy identification.
And that’s it! Your YubiKey setup is complete. You can now securely log in to your Google account on any device. Repeat these simple steps for each account you wish to safeguard.
How to Use a YubiKey for Code Signing Certificate?
Your code signing certificate acts as a key to unlock the trust placed in your applications. Should this certificate fall into the wrong hands, cybercriminals would gain the ability to falsify software, compromising your users’ security and potentially causing irreparable damage to your reputation.
Hackers may use a stolen code signing certificate to sign malicious software, making it appear legitimate. Unsuspecting users, trusting the signed certificate, could unknowingly install harmful applications, leading to data breaches, financial losses, and legal repercussions.
Such incidents erode trust in your brand and deter users from downloading your software in the future. To prevent this nightmare scenario, you may want to use tools like YubiKey to safeguard your code signing certificate. Here are the best practices to use and protect YubiKey for code signing certificate;
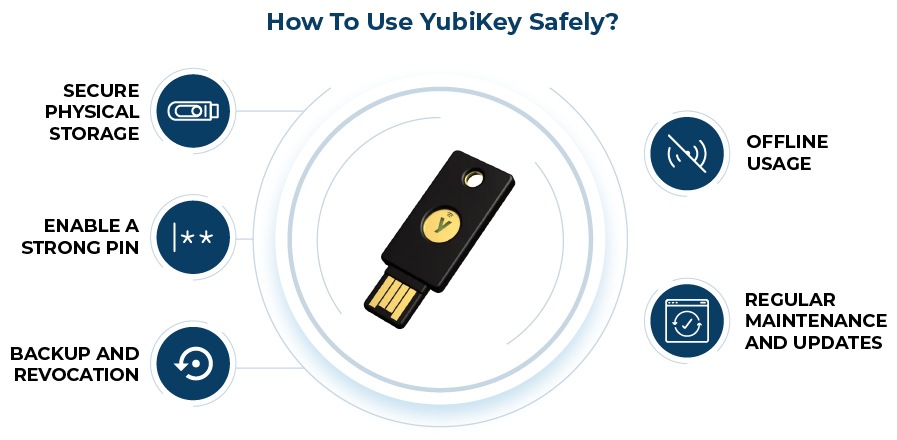
Secure Physical Storage
Treat your YubiKey like a precious unlock to your code signing security. Keep it in a secure physical location. This can be a locked drawer or a safe, away from prying eyes and potential theft. Never leave it unattended. Also, never leave it in easily accessible areas to prevent unauthorized use.
Enable a Strong PIN
Protect your YubiKey with a robust PIN or password. The password or pin you choose here is your first line of defense against unauthorized access. Choose a PIN that is unique and not easily guessable. Avoid using common combinations like “123456” or “password,” and opt for longer passphrases for added security.
Backup and Revocation
Create a backup of your code signing certificate and store it securely. In case your YubiKey is lost, stolen, or damaged, having a backup ensures you can still access your code signing capabilities and revoke the certificate from the compromised YubiKey promptly.
Offline Usage
Whenever possible, use your YubiKey in offline mode. This means disconnecting it from the internet or your device when not in use for code signing. When you operate offline, you reduce the risk of remote attacks and protect your code signing information from potential hackers.
Regular Maintenance and Updates
Perform regular checks and updates on your YubiKey. Ensure it has the latest firmware and software to protect against potential vulnerabilities. Regular maintenance keeps your YubiKey functioning optimally and enhances its security features.
Process of Code Signing with the YubiKey
Code signing with YubiKey shouldn’t be stressful. But to meet new code signing signature rules, generating and storing your private key on a FIPS-validated YubiKey is essential.
With the attestation certificate, you can verify that your private key was generated on your YubiKey. For the sake of this article, we will break this guide into two parts that will cover the process of creating a key pair, generating a CSR, and acquiring an attestation certificate, using YubiKey Manager.
Steps for YubiKey CSR Generation and Attestation
Step 1: Install YubiKey Manager
- Begin by visiting Yubico’s website and downloading YubiKey Manager for your operating system (Windows, Linux, or macOS).

- Install the application following the on-screen instructions.

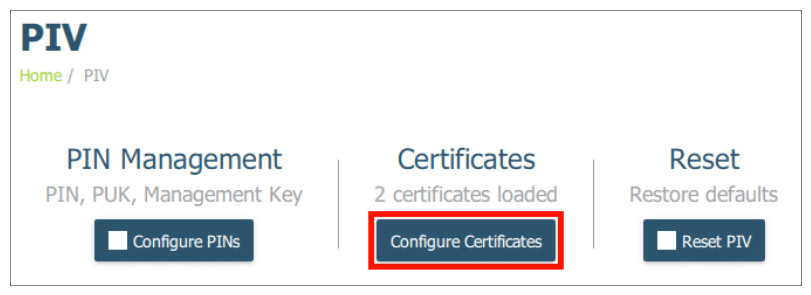
Step 2: Access YubiKey Manager and Configure Certificates
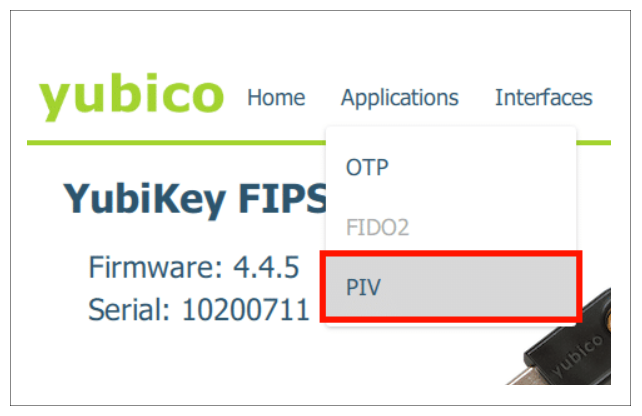
- Launch YubiKey Manager and navigate to Applications > PIV.

Step 3: Generate Keypair and CSR
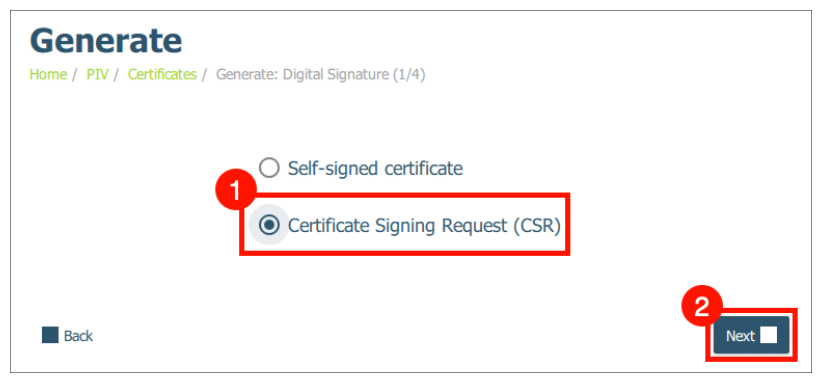
- Click on “Configure Certificates“. From the options, select “Authentication (Slot 9a)” for code signing certificates.

- Click “Generate” and choose “Certificate Signing Request (CSR).” Follow the prompts.

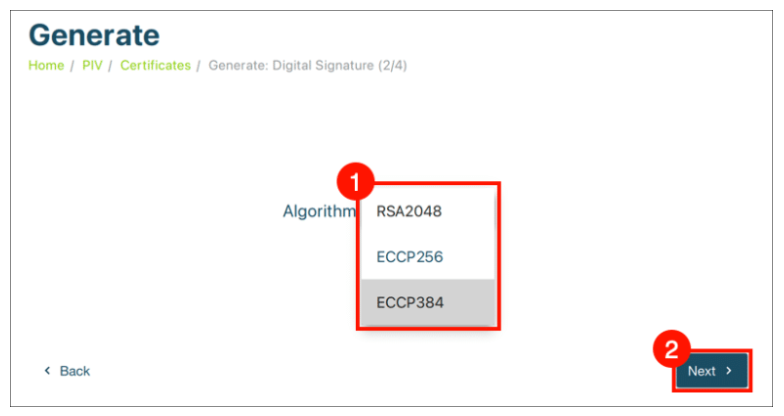
Step 4: Choose Algorithm and Enter Subject Name
- Select an algorithm (choose ECCP384 for Code Signing Certificates) and enter a Subject Name for the certificate.

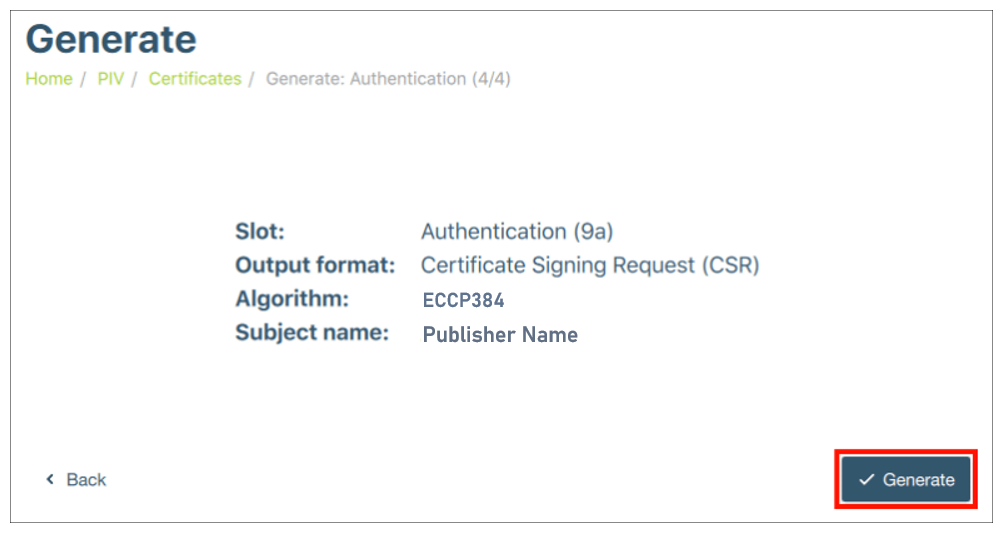
Step 5: Generate CSR and Provide Information
- Click “Generate” and provide the directory path to save the CSR.

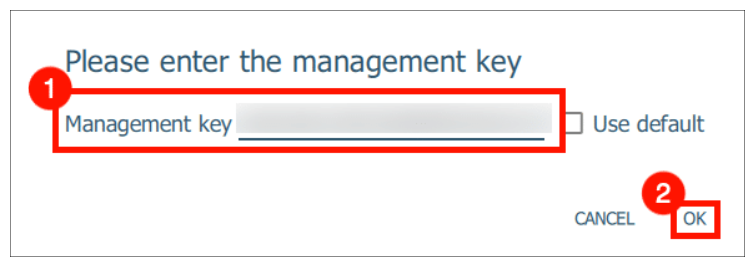
- Enter the management key.

- Enter your PIN.

Step 6: Prepare Your Terminal or PowerShell
- If you use Windows, open PowerShell as an administrator.
- For macOS and Linux, open a terminal window.
Step 7: Navigate to YubiKey Manager Directory
Change your current directory to YubiKey Manager’s file path:
- For Windows:
cd "C:\Program Files\Yubico\YubiKey Manager"
- For macOS:
cd /Applications/YubiKey\ Manager.app/Contents/MacOS
- For Linux: Open any terminal window (key attestation file will be saved in the same path).
Step 8: Generate Attestation Certificate
Execute the command according to your operating system:
- For Windows:
.\ykman.exe piv keys attest -F PEM 9a attestation.crt
- For macOS:
./ykman piv keys attest -F PEM 9a attestation.crt
- For Linux:
ykman piv keys attest -F PEM 9a attestation.crt
Step 9: Obtain Intermediate Certificate
Execute the command to export the intermediate certificate:
- For Windows:
.\ykman.exe piv certificates export -F PEM f9 intermediateCA.crt
- For macOS:
./ykman piv certificates export -F PEM f9 intermediateCA.crt
- For Linux:
ykman piv certificates export -F PEM f9 intermediateCA.crt
Step 10: Encode Attestation Certificate
Follow these steps to create a base64-encoded attestation file:
- For Windows (CMD/PowerShell):
type attestation.crt intermediateCA.crt > attestation.pem
certutil -encode attestation.pem attestation.b64
findstr /v CERTIFICATE attestation.b64 > attestation.b64
- For Linux:
cat attestation.crt intermediateCA.crt > attestation.pem
base64 attestation.pem > attestation.b64
grep -v CERTIFICATE attestation.b64
Step 11: Complete the Process
- Submit the CSR file (content of CSR.txt) and the base64-encoded attestation (attestation.b64) to your order configuration portal to finalize the process.
How to a Install a Code Signing Certificate on YubiKey 5 FIPS
Importing your Certificate into YubiKey
Step 1: Access YubiKey Manager and Navigate to PIV
- Launch YubiKey Manager and navigate to the Applications section.
- Select PIV (Personal Identity Verification).
Step 2: Configure Certificates
- Inside the PIV section, find and click the “Configure Certificates” setting.
Step 3: Choose the Right Slot
- In the Configure Certificates section, choose the Authentication tab corresponding to the YubiKey slot where you generated your key pair. (Remember, if you followed our CSR generation guide above, this would be Slot 9a.)
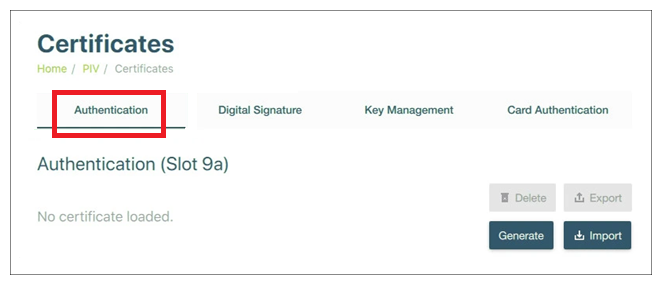
Step 4: Import Your Certificate
- Click the Import button and browse to find the code signing certificate file provided by your Certificate Authority (CA).
- Once you’ve located the certificate file, import it into your YubiKey.
Step 5: Input the Management Key
- When prompted, enter the Management Key of your YubiKey 5 FIPS device.
- If you haven’t changed the management key yet, simply check the “Use default” checkbox.
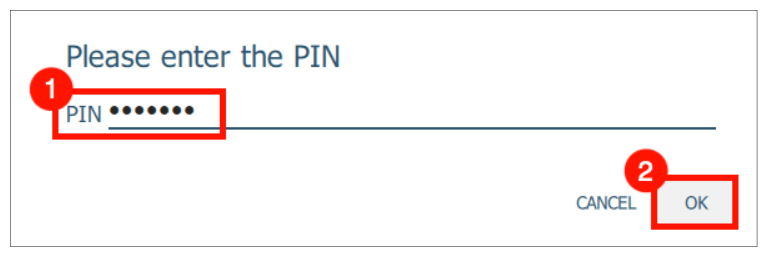
Step 6: Provide Your PIN
- Next up, you’ll be asked for the PIN of your YubiKey 5 FIPS device.
- Enter the PIN and hit OK to wrap up the installation.
How to Sign your files with Code Sign Certificate using YubiKey
Step 1: Prepare and Access the Signing Tool
To begin, you’ll need the signtool.exe tool from the Windows SDK package;
- Download and Install the Windows SDK: Obtain the Windows SDK package and install it on your system. This package includes the signtool.exe tool required for code signing.
- Locate signtool.exe:
- Open File Explorer and navigate to the following path:
C:\Program Files (x86)\Windows Kits\10\bin\10.0.22621.0\x64
- If your Windows installation is 32-bit, adjust the path to:
C:\Program Files\Windows Kits\10\bin\10.0.22621.0\x86
Step 2: Execute Code Signing
With signtool.exe in hand, you’re ready to sign your files using your YubiKey-protected Code Sign Certificate:
- Launch Command Prompt (CMD) with administrative privileges to ensure smooth execution of the signing process.
- Use signtool.exe to sign your file: Enter the following command, adjusting the path and flags accordingly:
signtool sign /tr http://timestamp.sectigo.com /td sha256 /fd sha256 /a "Path_to_the_file_you_wish_to_sign"
- The /a flag automatically selects the best certificate from your Windows Certificate Store/USB Token for signing.
- Replace “Path_to_the_file_you_wish_to_sign” with the actual path of the file you want to sign.
-
- For Sectigo/Comodo Code Sign:
http://timestamp.sectigo.com
- For DigiCert Code Sign:
http://timestamp.digicert.com
- For Sectigo/Comodo Code Sign:
Step 3: Verify Your Signed File
- Execute the command below to ensure your file has been successfully signed:
signtool verify /pa “Path to the file you’ve signed”
Closing Thoughts
Congratulations! That’s how to sign your executable file with the certificate stored in the YubiKey.
You can verify the digital signature in the Digital Signature tab of the executable file properties. If you run into any issues with the code signing process, you can troubleshoot by disconnecting and then reconnecting your YubiKey.
Related Articles:
- TPM vs. HSM: Key Differences, Features, and Use Cases
- Top Changes in Issuing OV Code Signing Certificate After June 1st, 2023
- What is Code Signing Certificate? How Does it Work?
- The Detailed Guide to Code Signing Certificate Best Practices
- Code Signing Certificate – Upgrade Security with 3072-bit Key Length
- EV Code Signing vs. Regular Code Signing : Decode the Differences
