The Barracuda SSL VPN is a flexible and secure way to connect to network resources and internal business applications. It is an ideal for remote workers and business travelers who work on web and mobile platform. Only you need an internet connection and a web browser to access the Barracuda SSL VPN. In this piece of information, we will go through the process of SSL installation on the Barracuda SSL VPN. To install SSL, you have to follow two processes like
- Download and Extract Certificate files
- Upload the private key and SSL certificate file
Download and Extract SSL Certificate:
The certificate authority sends an SSL certificate in a zip file to you in an email, which you have to download it and extract it to the local directory on the server.
Upload the private key and SSL certificate file:
The combined private key and signed SSL certificate files remain in .pfx format, which is not an ideal format for installation so you have two option to upload each file to the Barracuda SSL VPN.
The first option is direct upload on Barracuda Admin console while the other option is to convert two files into a text editor and then upload them to Barracuda Admin console.
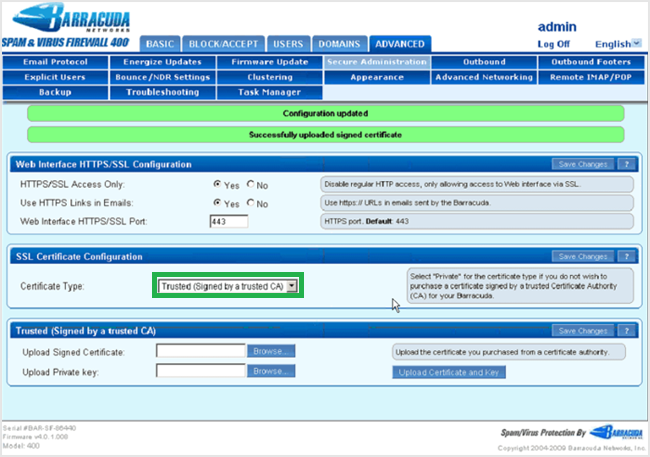
Method #1: Upload via Barracuda Admin console:
- Log into Barracuda Admin console.
-
Browse Advanced and click on “Secure Administrator” or “SSL” tab.

- To upload the private key file received during the CSR generation, you have to use “Upload Private Key” field.
- On the other hand, you also have to browse the certificate file to “Upload Signed certificate”.
-
After both files uploading, select “Trusted (Signed by a trusted CA)” as a default “Certificate Type”.

- Click on “Save Changes”.

Method #2: Upload via Text Editor:
When you receive a private key and a signed certificate in the .pfx format, which needs to be converted in (.crt) format with the help of a text editor. For that, you have to follow necessary steps:
- Open both Private Key and signed certificate file using notepad.
- Open a new Notepad file. Copy the data from both files and paste in a notepad individually and save it as mydomain_cert.crt.
- If the intermediate SSL certificate is needed in the installation process, then copy and paste the data of the certificate after the signed certificate.
- To upload a mydomain_cert.crt file with the help of “Upload Signed Certificate” found under Advance> Secure Administration tab.
- Under the SSL certificate configuration, choose Trusted (Signed by a trusted CA) as a Certificate Type.
- Click on “Save Changes”.
Now, You must have to restart your Barracuda SSL VPN. You can use our SSL installation checker tool that will help you to diagnose SSL certificate errors.
